How to Train a YOLOv10 Model with a Custom Dataset: A Comprehensive Guide

 The YOLO (You Only Look Once) series has solidified its reputation as a top choice for object detection, acclaimed for its remarkable speed and precision. With each successive version, the YOLO family consistently advances the field of computer vision, and YOLOv10 is no different in pushing these boundaries.

In this guide, we'll walk you through the steps to train a YOLOv10 model with a custom dataset. We'll use an example of training a vision model to identify chess pieces on a board. However, the principles outlined in this guide are flexible and can be adapted to any dataset you choose.

What is YOLOv10?

Released in May 2024, only three months after YOLOv9, YOLOv10 is the latest iteration of the YOLO series, continuing its legacy while introducing significant innovations that set new benchmarks in object detection capabilities.

YOLOv10 builds upon the advancements made by YOLOv9 and introduces several key enhancements. Notably, YOLOv10 eliminates the need for non-maximum suppression (NMS) during inference, which reduces latency and enhances efficiency. This is achieved through a consistent dual assignment strategy that improves the training process by providing rich supervisory signals and aligning the training and inference stages more effectively​.

Performance and Efficiency Improvements in YOLOv10

The YOLOv10 model is available in six variants, categorized based on their parameter count:

Model

size (pixels)

APval

Params (M)

FLOPs (G)

Latency (ms)

YOLOv10-N

640

38.5%

2.3

6.7

1.84

YOLOv10-S

640

46.3%

7.2

21.6

2.49

YOLOv10-M

640

51.1%

15.4

59.1

4.74

YOLOv10-B

640

52.5%

19.1

92.0

5.75

YOLOv10-L

640

53.2%

24.4

120.3

7.18
YOLOv10-X

640

54.4%

29.5

160.4

10.70

  • Speed: YOLOv10 significantly improves image processing speed over its predecessors, achieving a higher frames-per-second (FPS) rate. 
  • Accuracy: When benchmarked against the MS COCO dataset, YOLOv10 outperforms YOLOv9 in terms of accuracy.
Benchmark comparison of YOLOv10 with previous object detector
Comparisons of latency-accuracy (left) and size-accuracy (right) of YOLOv10 with previous object detection models [2].

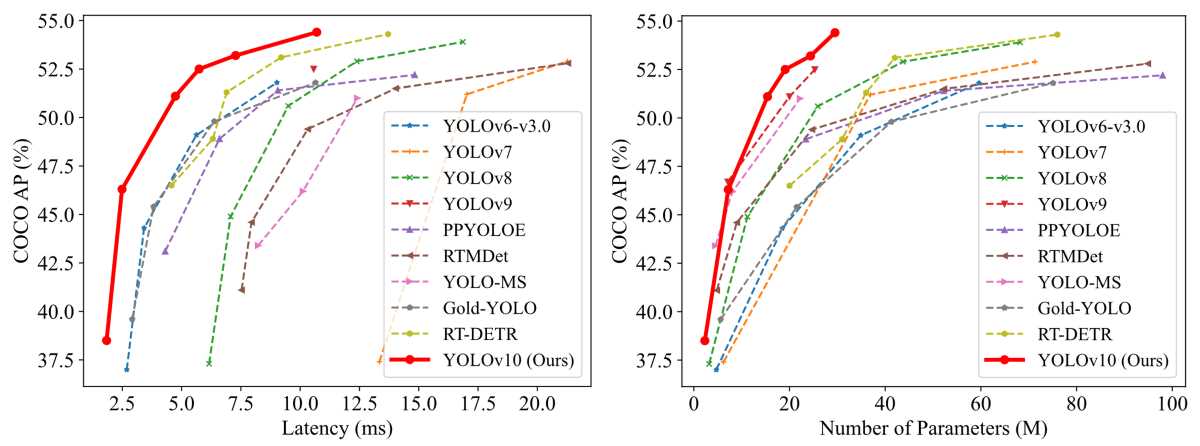
Compared to YOLOv9-C, YOLOv10-B achieves a 46% reduction in latency while maintaining the same performance level. Additionally, YOLOv10 showcases highly efficient parameter utilization. For instance, YOLOv10-L and YOLOv10-X surpass YOLOv8-L and YOLOv8-X by 0.3 and 0.5 average precision (AP) points, respectively, while using 1.8× and 2.3× fewer parameters. Similarly, YOLOv10-M matches the average precision of YOLOv9-M, but with 23% and 31% fewer parameters, respectively.

Architecture and Innovations

YOLOv10 introduces several architectural innovations aimed at enhancing both efficiency and accuracy in real-time object detection. The architecture builds on previous YOLO models, integrating new design strategies to improve performance.

YOLOv10 architecture overview
Overview of the YOLOv10 architecture, dual assignments for NMS-free training [2].

Key Components

1. Backbone:

  • Utilizes an enhanced version of CSPNet (Cross Stage Partial Network) to improve gradient flow and reduce computational redundancy. This improvement is fundamental in feature extraction, allowing the model to process images more effectively.

2. Neck:

  • Features Path Aggregation Network (PAN) layers for effective multiscale feature fusion. This component aggregates features from different scales and passes them to the head, ensuring the model can accurately detect objects of various sizes.

3. Head:

  • One-to-Many Head: Used during training to generate multiple predictions per object. This head provides rich supervisory signals that improve learning accuracy.
  • One-to-One Head: Used during inference to generate a single best prediction per object. This head eliminates the need for non-maximum suppression (NMS), reducing latency and improving efficiency​​.

Innovations

1. NMS-Free Training:

  • Non-Maximum Suppression (NMS): NMS is a technique used in object detection to select the best bounding box for each object when multiple overlapping boxes are predicted. It works by eliminating boxes that have a high overlap with a higher confidence box, thus keeping only the most accurate ones. However, NMS takes additional computational time, which can slow down the inference process.

  • YOLOv10 employs consistent dual assignments for label matching, eliminating the need for NMS during inference. This strategy significantly reduces inference latency and aligns the training and inference stages more effectively. The dual label assignments include:some text
    • One-to-Many Assignment: Provides rich supervisory signals by assigning multiple positive samples per ground-truth object.
    • One-to-One Assignment: Ensures a single best prediction per object during inference, improving efficiency and reducing latency. The consistent matching metric ensures harmonious supervision for both heads during training​​​​.

2. Holistic Model Design:

Comprehensive optimization of model components from both efficiency and accuracy perspectives includes:

  • Lightweight Classification Heads: Reduces the computational overhead by using efficient convolution operations, allowing for faster processing without compromising accuracy.
  • Spatial-Channel Decoupled Downsampling: Separates the spatial reduction and channel modulation, minimizing information loss and enhancing efficiency during downsampling.
  • Rank-Guided Block Design: Adapts the complexity of blocks based on their stage redundancy, optimizing parameter utilization and improving overall model efficiency​

3. Enhanced Feature Extraction:

  • Incorporation of large-kernel convolutions and partial self-attention modules boosts performance without significantly increasing computational costs.

Easily train YOLOv10 on a custom dataset

The Ikomia API enables efficient training and inference of the YOLOv10 object detector with minimal coding effort.

Setup

To begin, it's important to first install the API in a virtual environment [3]. This setup ensures a smooth and efficient start to using the API's capabilities.


pip install ikomia

Dataset

For this tutorial, we're using a Chess Pieces dataset from Roboflow, which includes 693 images [4]. This dataset is ideal for training our custom YOLOv10 object detection model. It contains 12 labels: pawn, knight, bishop, rook, queen, and king, each in both black and white.

Chess pieces dataset

Train YOLOv10 with a few lines of code

You can also directly charge the notebook we have prepared.


from ikomia.dataprocess.workflow import Workflow
import os


#----------------------------- Step 1 -----------------------------------#
# Create a workflow which will take your dataset as input and
# train a YOLOv10 model on it
#------------------------------------------------------------------------#
wf = Workflow()

#----------------------------- Step 2 -----------------------------------#
# First you need to convert the YOLO format to IKOMIA format.
# Add an Ikomia dataset converter to your workflow.
#------------------------------------------------------------------------#
dataset = wf.add_task(name="dataset_yolo")

dataset.set_parameters({
        "dataset_folder":"path/to/chess_pieces/dataset/train",
        "class_file":"path/to/chess_pieces/train/_darknet.labels"
})

#----------------------------- Step 3 -----------------------------------#
# Then, you want to train a YOLOv10 model.
# Add YOLOv9 training algorithm to your workflow
#------------------------------------------------------------------------#
train = wf.add_task(name="train_yolo_v10", auto_connect=True)
train.set_parameters({
    "model_name":"yolov10s",
    "epochs":"50",
    "batch_size":"8",
    "train_imgsz":"640",
    "test_imgsz":"640",
    "dataset_split_ratio":"0.8",
    "output_folder":os.getcwd(),
}) 

#----------------------------- Step 4 -----------------------------------#
# Execute your workflow.
# It automatically runs all your tasks sequentially.
#------------------------------------------------------------------------#
wf.run()

Here are the configurable parameters and their respective descriptions:

  • model_name (str) - default 'yolov10m': Name of the YOLOv10 pre-trained model. Other model available:some text
    • yolov10n
    • yolov10s
    • yolov10b
    • yolov10l
    • yolov10x
  • batch_size (int) - default '8': Number of samples processed before the model is updated.
  • epochs (int) - default '100': Number of complete passes through the training dataset.
  • dataset_split_ratio (float) – default '0.9': Divide the dataset into train and evaluation sets ]0, 1[.
  • input_size (int) - default '640': Size of the input image.
  • weight_decay (float) - default '0.0005': Amount of weight decay, regularization method.
  • momentum (float) - default '0.937': Optimization technique that accelerates convergence.
  • workers (int) - default '0': Number of worker threads for data loading (per RANK if DDP).
  • optimizer (str) - default '0.937': Optimizer to use, choices=[SGD, Adam, Adamax, AdamW, NAdam, RAdam, RMSProp, auto]
  • lr0 (float) - default '0.01': Initial learning rate (i.e. SGD=1E-2, Adam=1E-3)
  • lr1 (float) - default '0.01': Final learning rate (lr0 * lrf)
  • output_folder (str, optional): path to where the model will be saved.
  • config_file (str, optional): path to the training config file .yaml.

The training process for 50 epochs was completed in approximately 30mins using an NVIDIA L4 24GB GPU.

Performance of our custom YOLOv10 model

Once your model has done training, you can assess the performance by looking the graphs produced by the YOLOv10 training process. These visualizations represent various metrics that are crucial for understanding the effectiveness of your object detection model.

Confusion matrix YOLOv10 confusion matrix

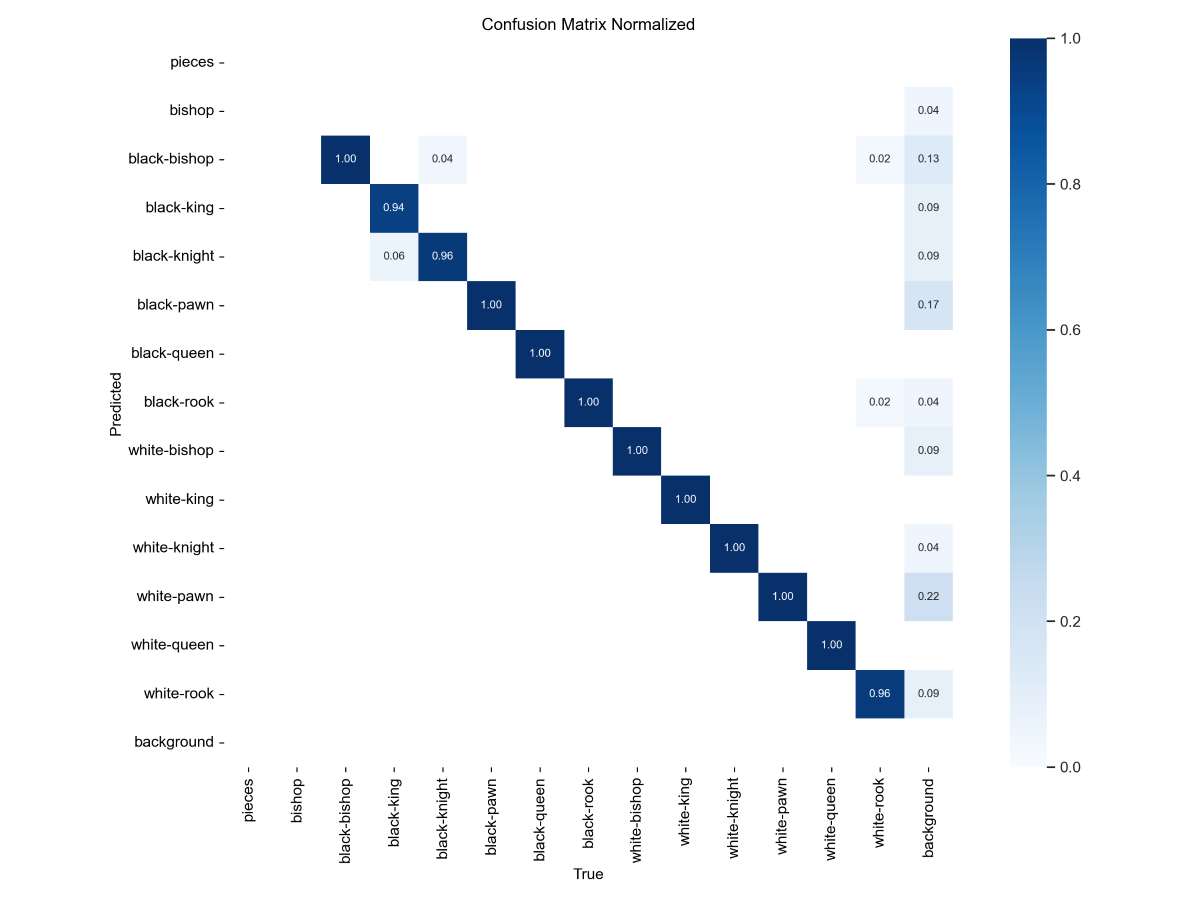
The confusion matrix indicates that the model shows high precision for most classes, such as black-pawn, black-rook, and white-king.

Training metric custom YOLOv10

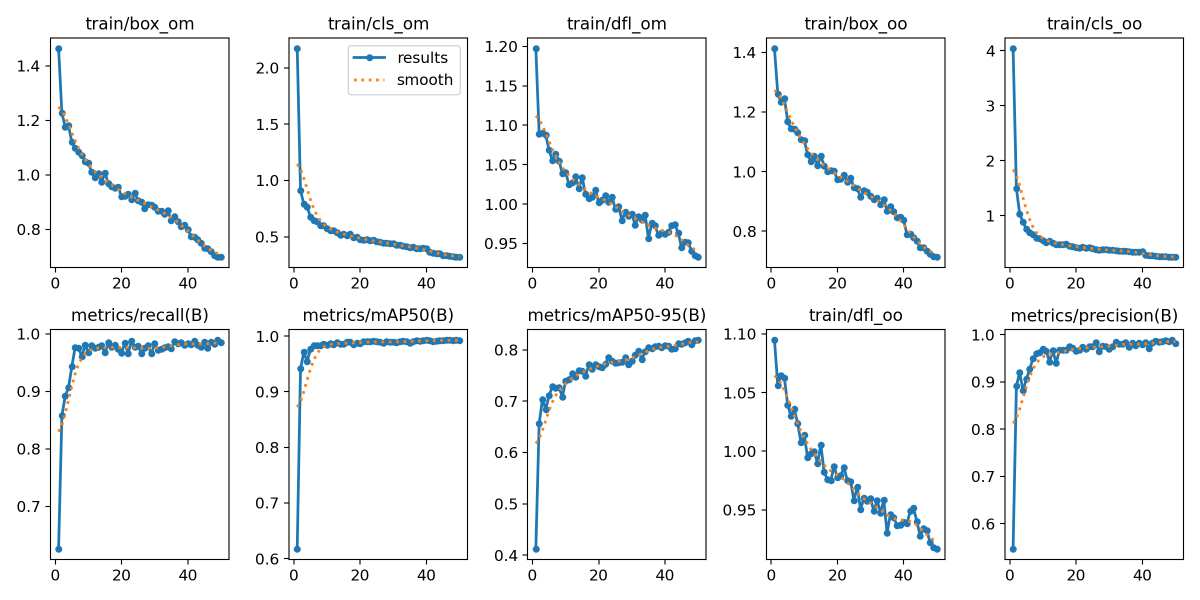
Looking at the box and classification Losses, both types of losses steadily decrease, indicating improved accuracy in object localization and classification over time.

YOLOv10 training metrics per classe

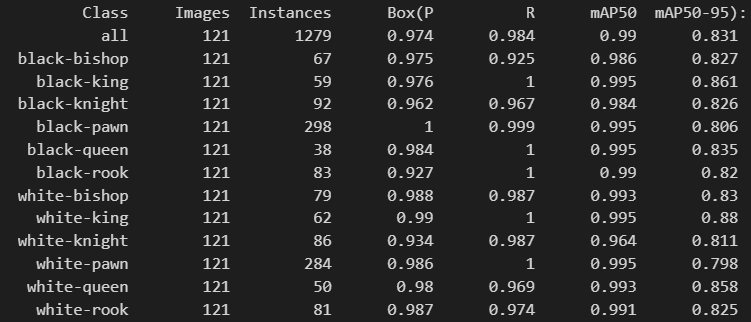
For the performance metrics, the recall and mAP show a consistent increase, demonstrating the model's enhanced ability to detect and accurately classify objects. 

Overall, the model has learned effectively, showing high precision, recall, and mAP values. However, based on the loses curves we can see that the model did not have enough opportunity to converge. Extending the training period could further improve performance by reducing minor classification errors and enhancing detection accuracy.

Run your fine-tuned YOLOv10 model

We can test our custom model using the ‘infer_yolo_v10’ algorithm. While by defaults the algorithm uses the COCO pre-trained YOLOv10m model, we can apply our fine-tuned model by specifying the 'model_weight_file' parameters accordingly.


from ikomia.dataprocess.workflow import Workflow
from ikomia.utils.displayIO import display


# Create your workflow for YOLO inference
wf = Workflow()

# Add YOLOv9 instance segmentation to your workflow
yolov10 = wf.add_task(name="infer_yolo_v10", auto_connect=True)

yolov10.set_parameters({
    "model_weight_file": "Path/To/[Timestramp]/weights/best.pt",
    "conf_thres": "0.5",
    "iou_thres":"0.25"
})

wf.run_on(path="Path/to/chess_yolo/dataset/test/b4ff4132c8c85da97d8bf9a2a4ed3e3d_jpg.rf.ec790769b4818025b7652ca6aab9307e.jpg")
          
# Inpect your result
display(yolov10.get_image_with_graphics())

YOLOv10 inference using custom model
YOLOv10 video inference using custom model

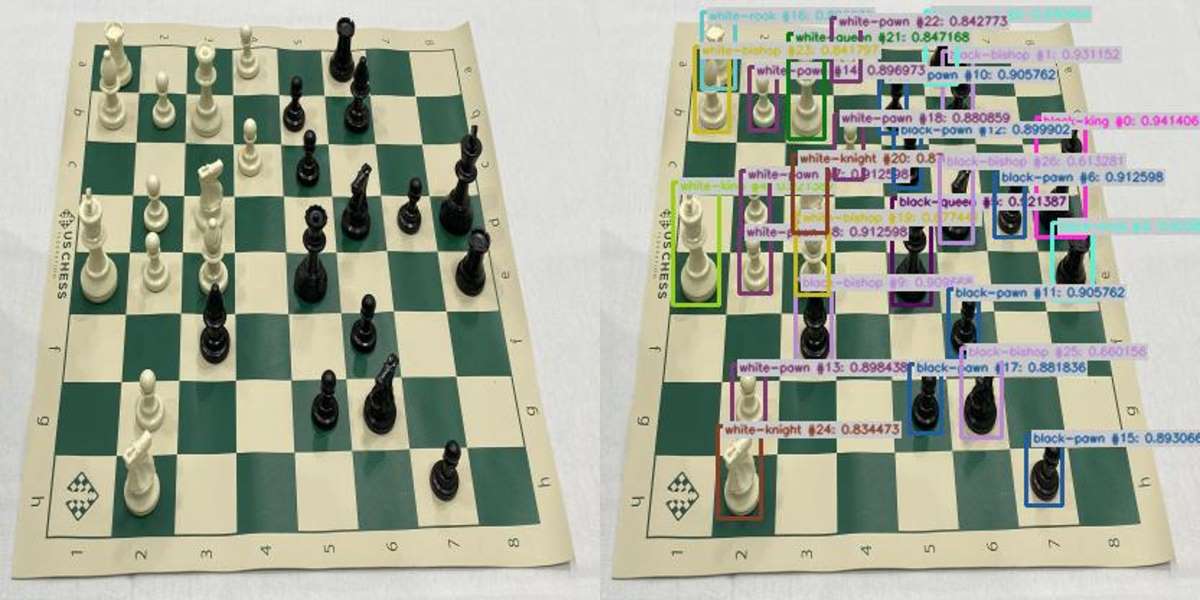
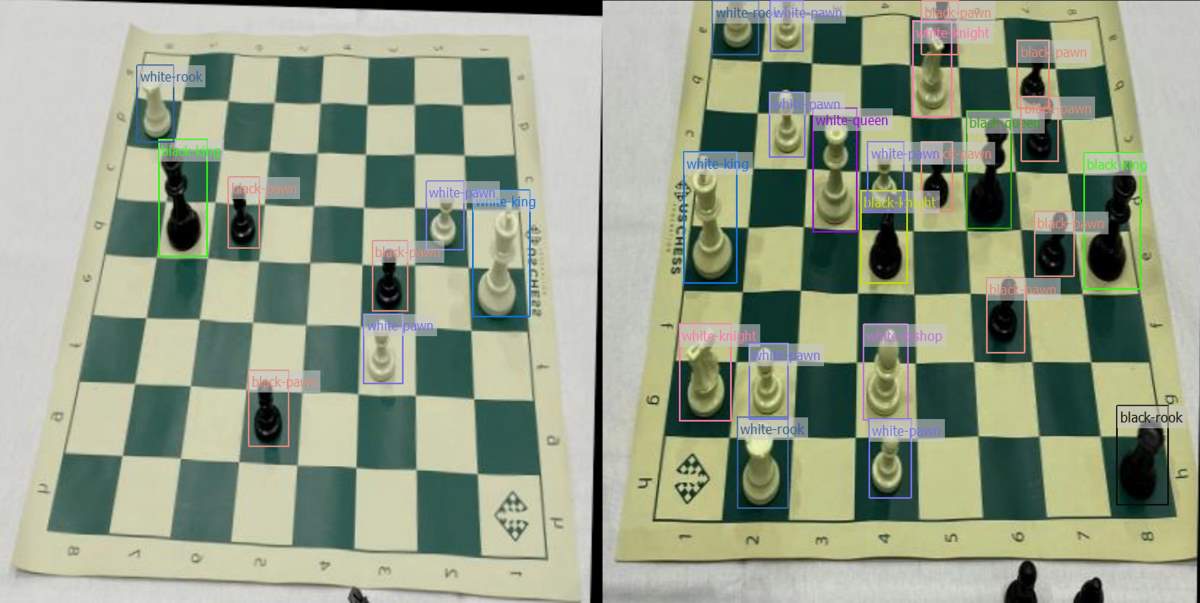
Our model successfully identified all the chess pieces, a first step towards developing a robot capable of beating Magnus Carlsen 😄! This achievement highlights the potential of the YOLOv10 model in accurately detecting and classifying complex objects.

We demonstrated how to train the highly performant YOLOv10 model on a custom dataset. The process outlined in this tutorial is easily adaptable to any dataset, making it a versatile tool for various applications. By leveraging the Ikomia API, this methodology can be seamlessly integrated into your projects, allowing you to harness the power of YOLOv10 for efficient and precise object detection tasks.

With further training and optimization, this approach can be extended to a wide range of real-world scenarios, pushing the boundaries of what's possible with AI-driven object detection.

Post a Comment

0 Comments